

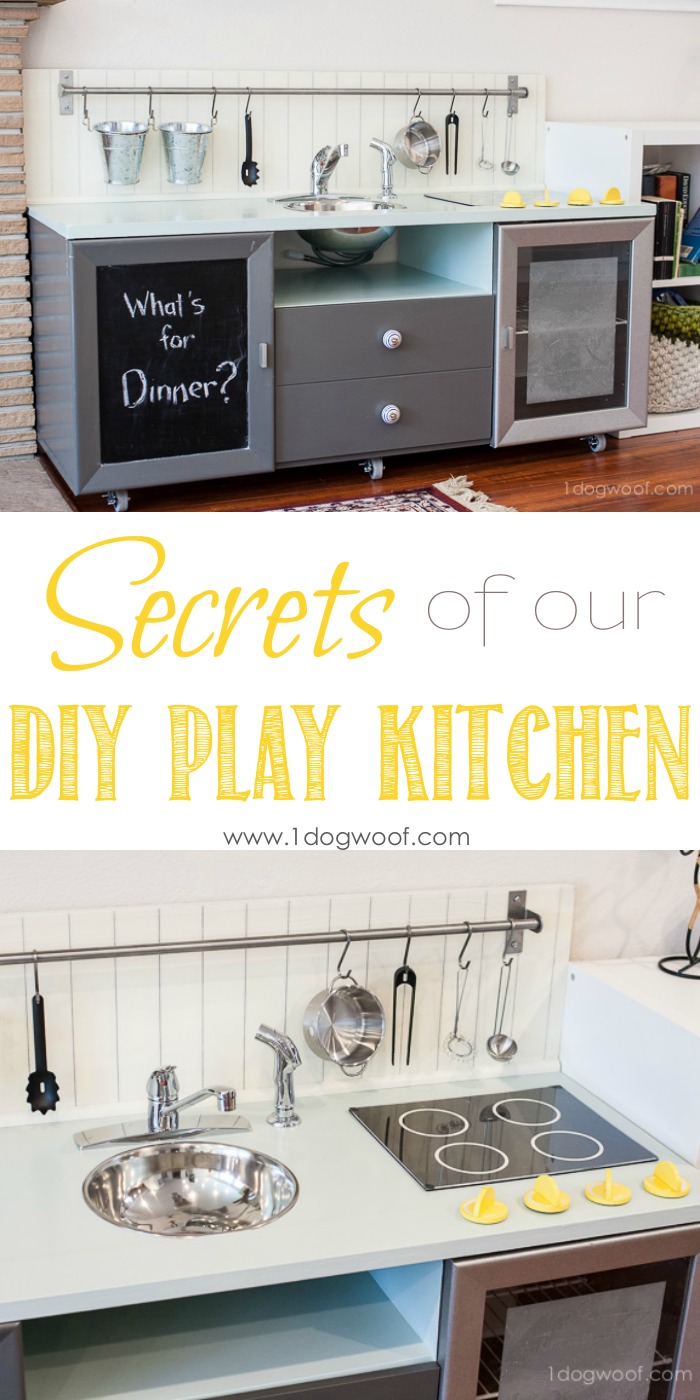
How To Build A Play Kitchen From Wood
So, you know how I like quick and easy crafts? Well, this post is not one of them. This post will be epic, long, and chock-ful of what I hope to be super useful information for you! Because why should you figure out how to build a DIY play kitchen from scratch when you can learn from me, right? Here we go.
First, the story. LM likes to get into things – dishwashers, drawers, cabinets – so I decided I wanted to get her a play kitchen so she stays out of MY kitchen. But they're EXPENSIVE, even on Craigslist. And then Drew reminded me we had our old tv stand hanging out in the garage, primed and ready for … something. Why not a play kitchen? And hence, the journey started.
Secret #1: Don't worry about how awesome all the other DIY play kitchens are. Yes, I know it's odd that I should start with that, when here I am hoping you'll be inspired by my DIY play kitchen, but trust me. I was paralyzed by the creativity of so many other play kitchens and wanted so many features that I didn't know where to start. But, this project is YOUR project, so get to a quiet space in your head and make it YOURS.
Start with your base cabinetry. Are you starting with a tv stand or a nightstand or a desk or a table? I started with a tv stand. I wanted a fridge and an oven with pull down doors. I realized that drop down doors wouldn't work in the space that we had, and are my kids really going to care whether there's a dishwasher or full size fridge or microwave? NO. I can get a gorgeous fun kitchen just by using what's already in front of me. It was a serious relief to let all that pressure go and just make the best of out what I had. Uh, way easier and less expensive too!
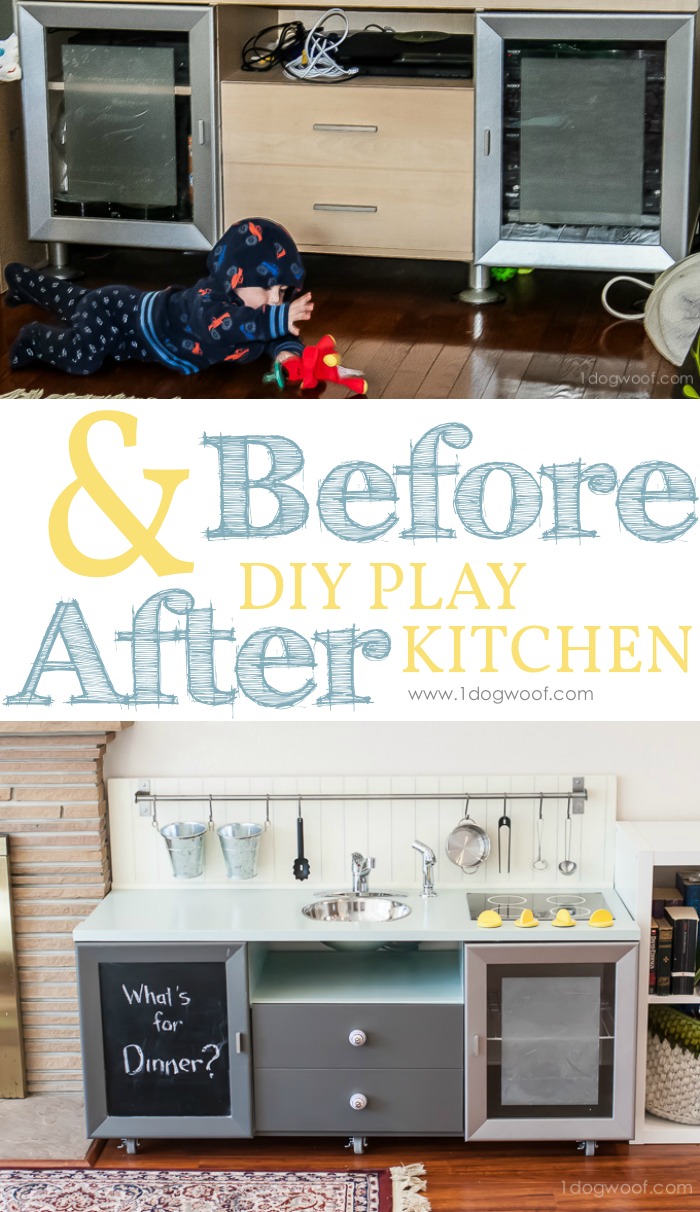
Here's the before picture. Actually, the you can catch a true before pic in our old living room, but here's the cabinet after taking the doors/knobs off and getting it primed with one coat of white paint.
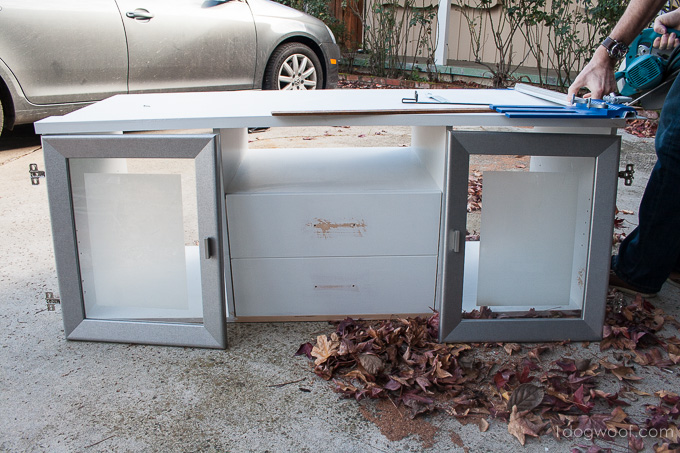
Secret #2: Depending on your piece of furniture, you'll want to sand it down really well. Drew had done some light sanding, but it wasn't enough and I had issues with the paint sticking later on in the process. Don't make my mistake.
I guess I should state here that this play kitchen, like any other project in this engineering household, had to meet certain restrictions. We wanted to spend as little as possible, within reason, and have it be lightweight, functional, and moveable. Let's go through those restrictions step by step.
Moveable
This is the easy one. Casters. We bought 6 casters – 1 for each corner and 2 for the middle. You really only need two braking casters (which are more expensive), but we accidentally bought 3.
Secret #3: Know how thick your internal and external walls are, so you know what length screws to buy. That will save you oodles of trips to Home Depot for $1.18 bags of screws and bolts.
Lightweight
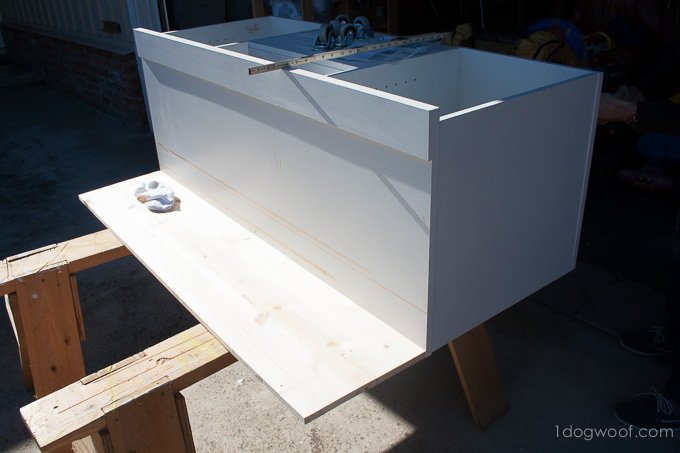
This one made us think a little bit. A lot, actually. The backsplash, back wall, stove, and inner shelving were modified for weight.

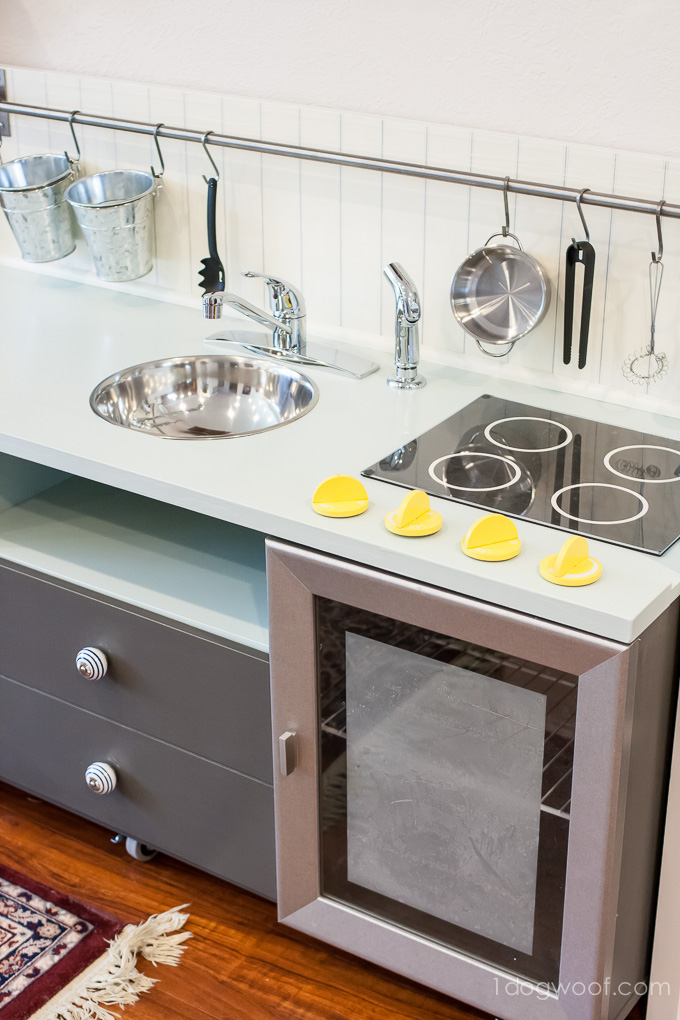
Backsplash
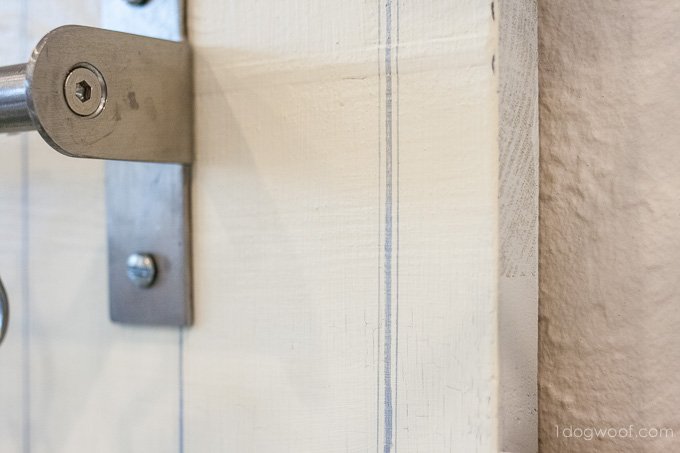
Secret #4: Hand drawing the backsplash. We bought a 12 inch by 1 inch by 6 feet piece of pine board and secured it to the top of the cabinet. It is secured using wood glue, straight metal brackets and possibly screws from the inside drilled into the bottom of the panel (not positive if Drew ended up doing the last bit). The backsplash was clamped in place overnight to let the glue dry.
Then came the decision of how to make it LOOK like a backsplash. My options were:
| Option | Pros | Cons |
| Real glass tile | beautiful | glass is heavy! |
| the real thing | expensive | |
| requires specialized tools | ||
| requires grouting | ||
| Smart Tiles – plastic tile sheets made to look like tile mosaics, found at Home Depot | each sheet is less than 1 sq ft. | $7 to $10 per sheet |
| lightweight | multiple designs online, but not available in store | |
| adhesive backing | ||
| Bead board paneling | gorgeous country kitchen style | 4ft by 8ft paneling ($20) is too much when I want to cover 5 sq ft. |
| 3 dimensional | heavy | |
| interlocking bead board | similar to hardwood floors – interlock only what you need – less waste | |
| $12 for wood pack – inexpensive | wood is heavy! | |
| $21 for vinyl pack – lightweight | too expensive for my budget | |
| decorative vinyl | $17 for tin panel look | not sure about tin panels as backsplash |
| adhesive, easy to install | ||
| contact paper/shelf liner | inexpensive (under $10) | cheesy designs, except for the cork and "stainless steel", but didn't want that look |
| adhesive, easy to install | ||
| hand painting (WINNER!) | inexpensive – less than $4 for a silver paint pen | not 3 dimensional like a real backsplash |
| lightweight – no additional weight | ||
| any color I wanted |
Yup, the winner was hand drawing my bead board backsplash. I primed and painted the pine board with ChalkPaint by Annie Sloan in Old White. For the lines, I bought a silver Sharpie oil-based paint pen ($3.25) and drew a vertical line every 2.5 inches down the length of the board. Then I went back with a Stabilo fine-point pen * in a silver color and drew 2 thin lines on either side of the paint pen line, to give it depth. A quilting ruler lay on its side on the cabinet and I used a metal ruler to draw the lines themselves.

To finish the look and to hide the paint/taping issues I had, I bought a 5 foot length of base shoe molding and fit it between the backsplash and the "countertop".
Back wall
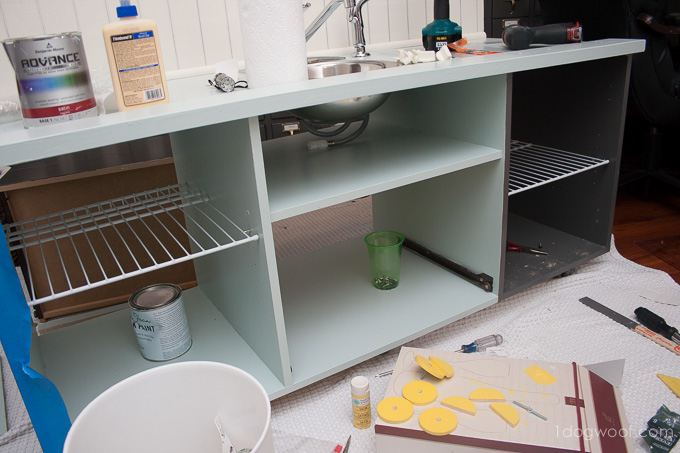
This is the only part that we haven't finished yet, but the plan is to just cover the back of the cabinet with poster board. Drew had already bought metal supports to cross-brace the whole piece so I didn't want to buy more materials for the back. I have plenty of poster board on hand at home, and the only purpose is to prevent toys from dropping out the back.
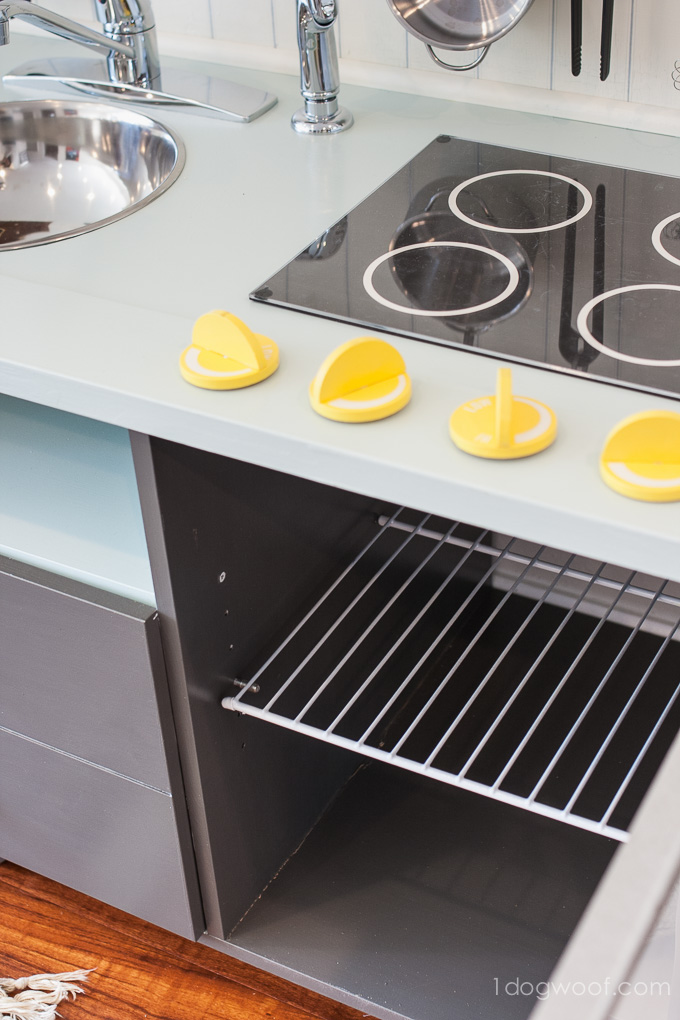
Stove
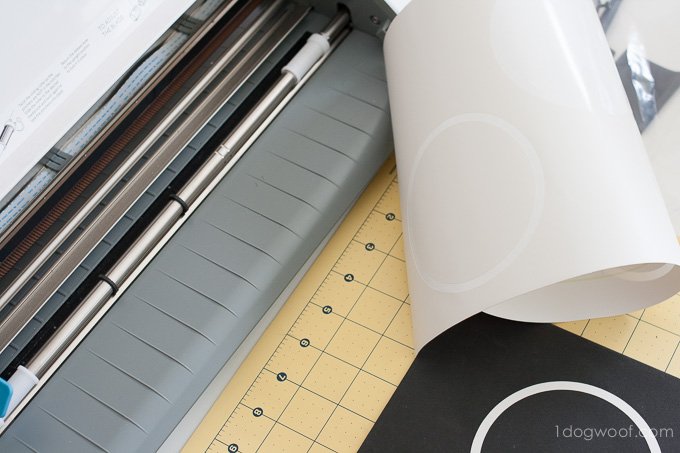
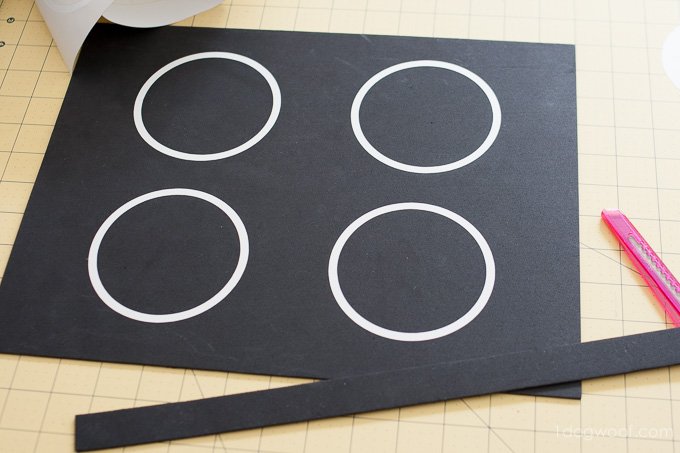
Here's another fun bit, the stove. This is where my Silhouette Cameo came in handy. After debating for days about how I wanted to make a stove, and whether I wanted it to be gas or electric, and did I want real working lights or make a grate similar to my pallet wood coasters, I had a eureka moment and decided to use foam.
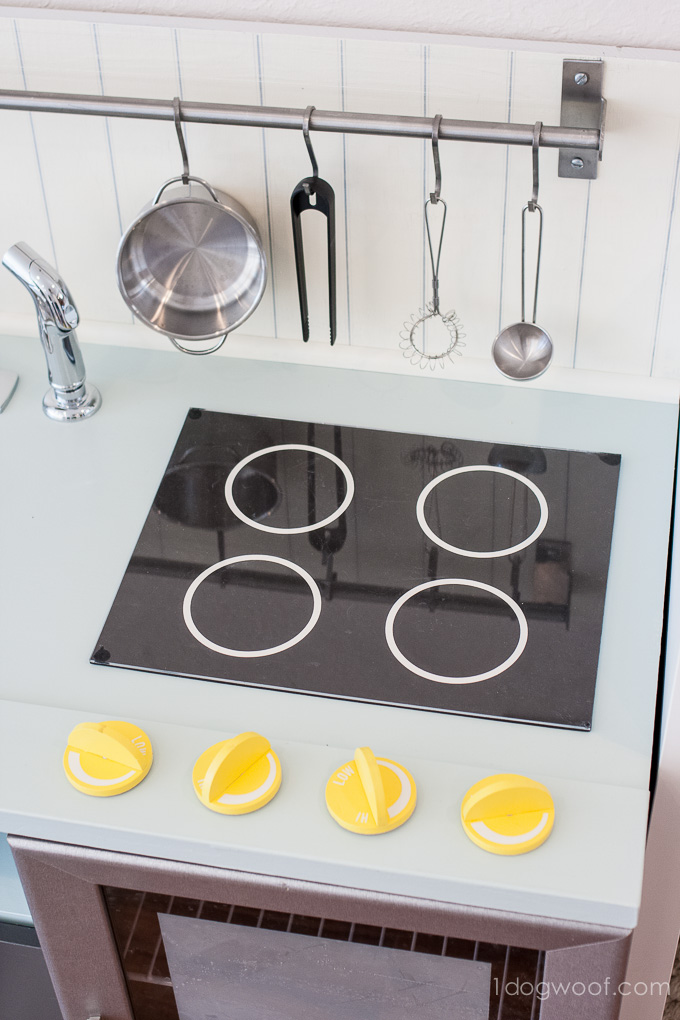
Secret #5: 1 piece of black craft foam ($1, Michaels) + 1 piece of 11×14 plexiglass ($5, Home Depot) + leftover white vinyl and a few drops of super glue made up my stove top. Since I was conforming to the 11×14 plexiglass, I designed and cut out 4 rings out of the white vinyl – they were 4 inches in diameter with an internal offset of 1/4 inch. The rings were peeled off and stuck onto the foam, which had already been cut to size. Add a few dabs of glue and pop the plexiglass on and you're all set! Not quite a gas stove, but not the electric coils either, since the coils aren't really visible until the stove is on and the coils light up. I know, picky picky, what can I say?
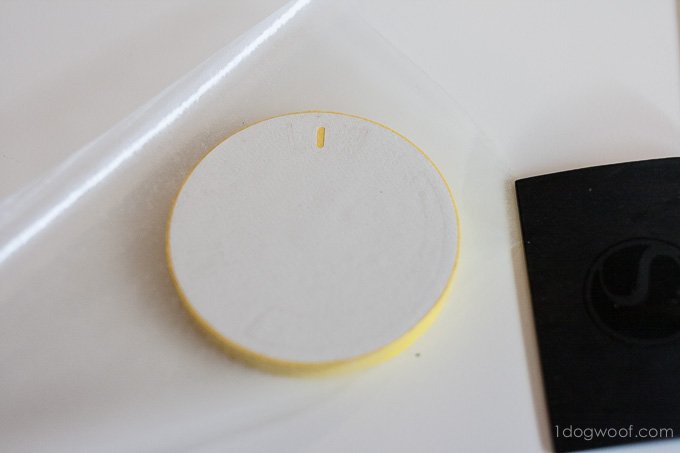
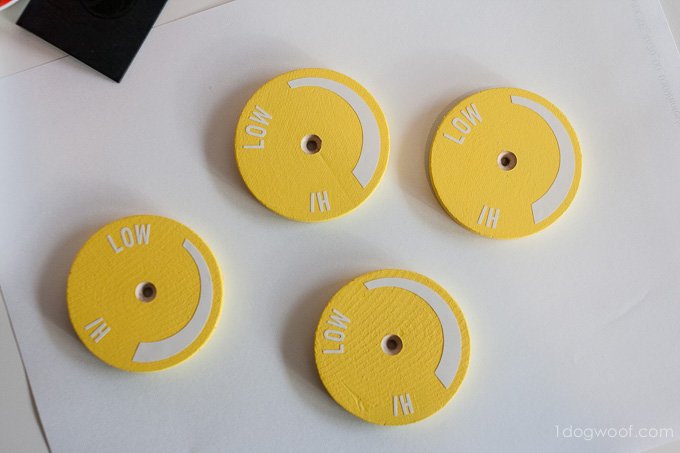
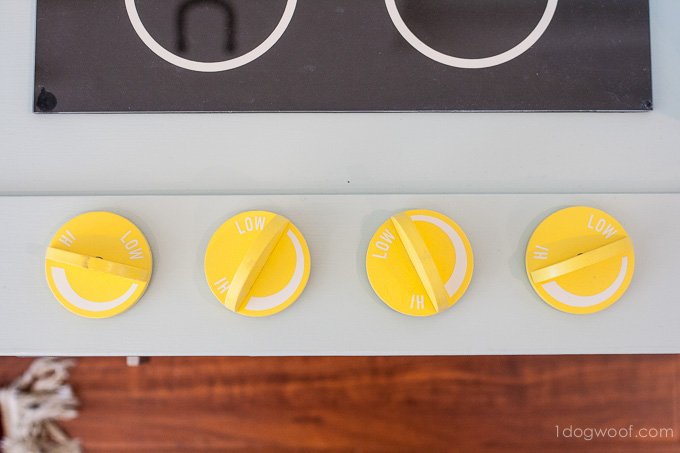
For the knobs, I bought 6 wood disks at Michaels – they were 2-1/4 inch in diameter and $1 each. A bit of a splurge there, but they were 1/4 inch thick and I wanted the thickness. 2 of the knobs were sawed in half by hand and all the pieces were painted individually. I probably put on 5 or 6 light coats of yellow acrylic paint.
I added in some fun knob details with my Silhouette. I designed a little gradient with a LOW and a HIGH indicator, cut it out of white vinyl, and transferred it to my wood disk. I know there is such a thing as "transfer paper", but I just use clear Contact paper*. After getting the design off the cutting mat, peel away the backing and extra vinyl, and place onto the wood disk. Carefully peel away the contact paper (Secret tip: I peel away at an extremely steep angle, using the Silhouette scraper to keep everything in place as I peel). Then carefully weed away what you don't want, and you're left with the stove knob indicators.
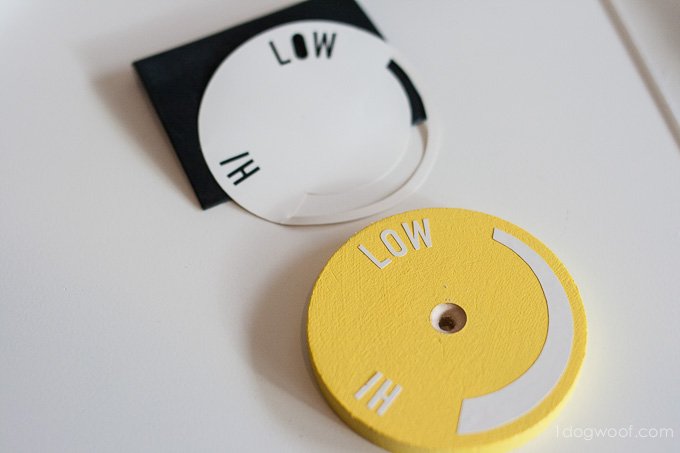
On the 4 disk bases, we drilled a hole slightly larger than the #8 screws we used to secure the knobs to the cabinet. I used#8-32 by 1-1/2 inch long philips flat head machine screws for the knobs. The package comes with matching nuts, but I also got a package of washers to keep the knobs slightly off the cabinet surface. In hindsight, I probably could have used longer screws so that the knob can be secured but still turn freely (see Secret #3 – I was pretty tired of running to HD at this point). As it is, it is possible for the knob to unscrew if you tried hard enough, but it's not so easy that the kids have figured it out.
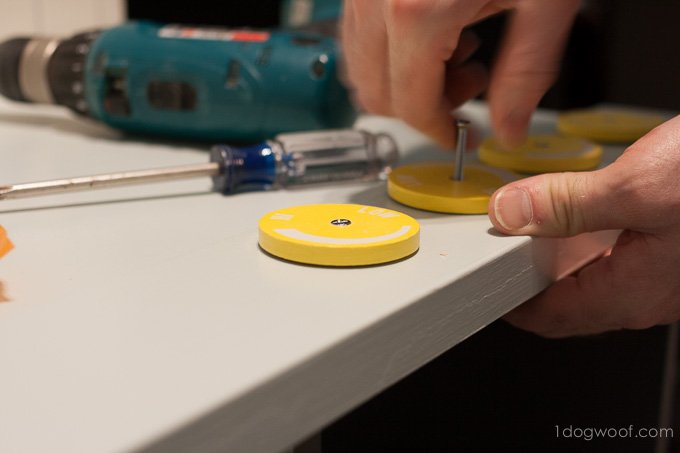
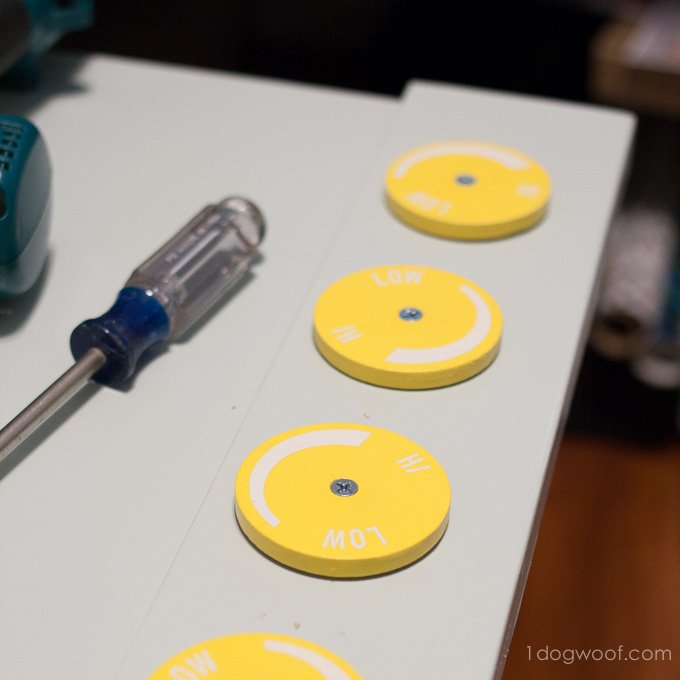
To finish, I added a coat of Mod Podge to seal everything down because the vinyl didn't stick very well to the wood. Plus, the MP gave a bit of a shine. Then the disks were attached to the cabinet and the half-circle tops were super-glued to the disks.Secret tip: Don't use wood glue here, use super glue. LM took the knob off on her first try when I had just used wood glue.
Functional
This play kitchen is a toy, but I wanted it to look good, so I went a-scouring for as much real stuff as I could.
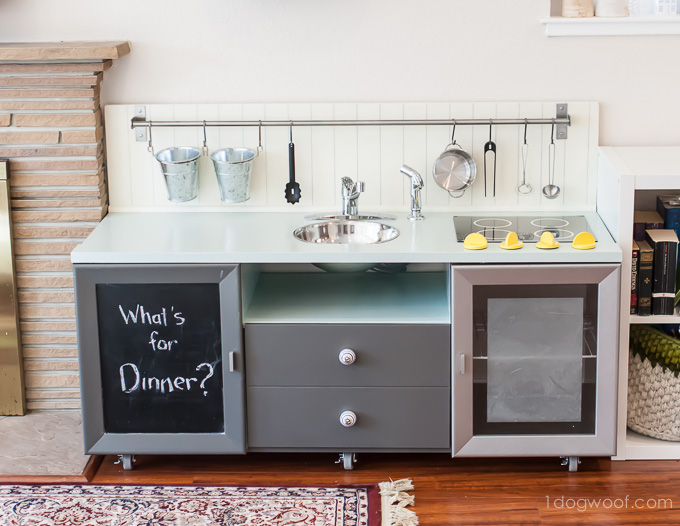
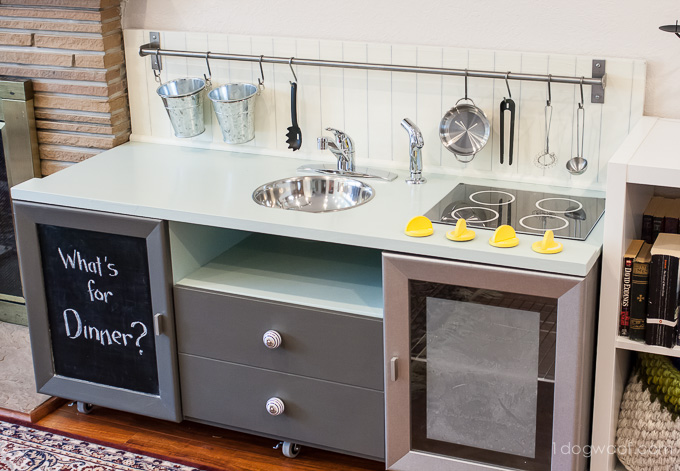
Secret #6: Pick up an old faucet from the Habitat for Humanity ReStore. I know, you might not have one around here, so you may need to resort to garage sales or Craigslist, but if there's a ReStore in your area, find it, and GO. I found my brand new, complete in box, not a fingerprint to be seen, faucet for $10. It even had the little spray nozzle for the side. Score! And even better, the set didn't come with unnecessary tubes, so all we had to do was drill a few holes, set the faucet in, and screw the bottoms in place. Easy peasy.
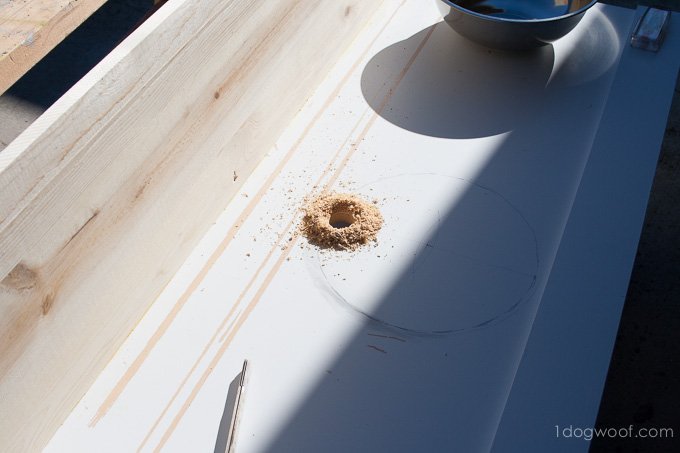
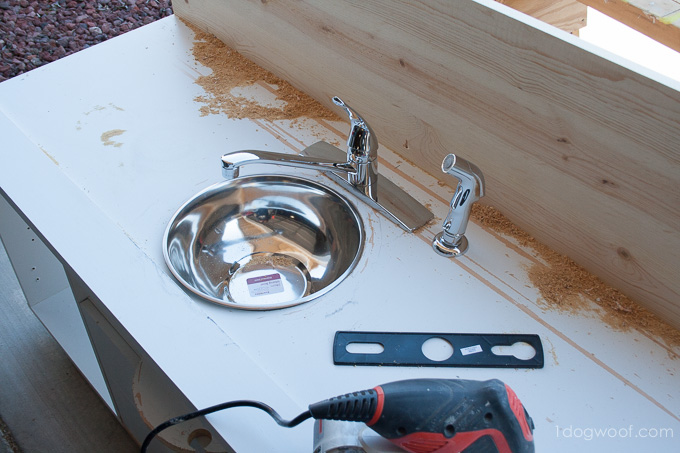
The sink is a mixing bowl I found at HomeGoods for $7. Drew drilled a hole in the top of the cabinet and then stuck his jig-saw in the hole to cut out the hole for the sink. The mixing bowl has a lip on it, so we measured the hole to be just less than the full diameter of the bowl so it pop right in.
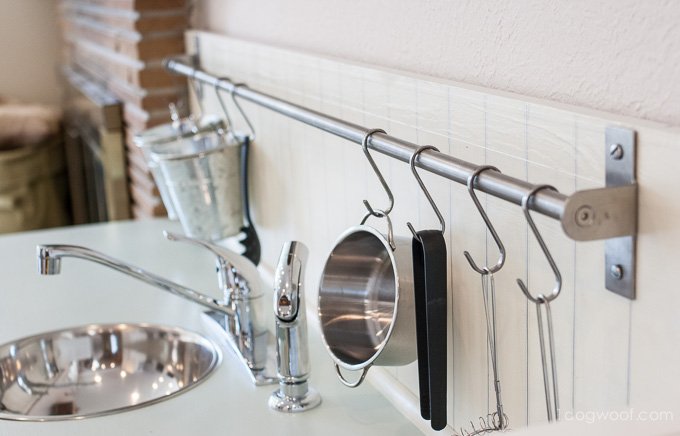
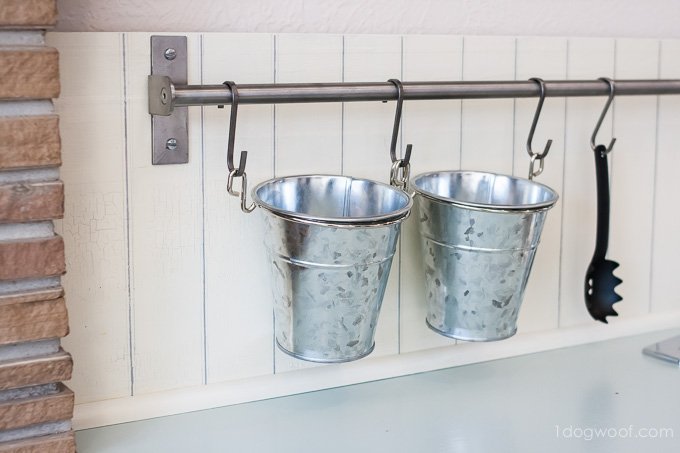
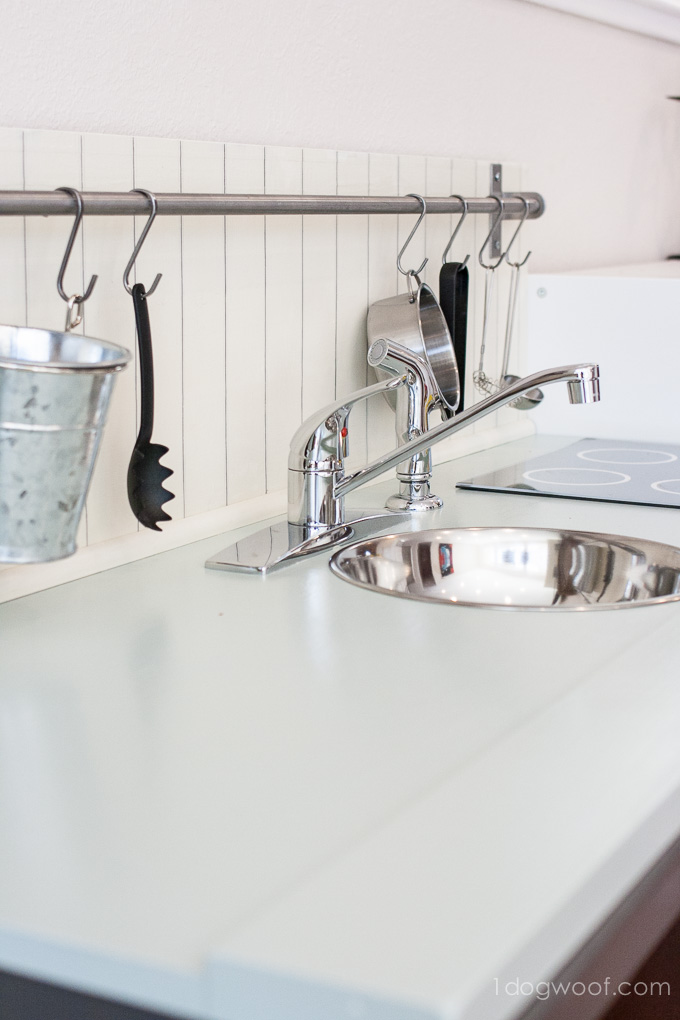
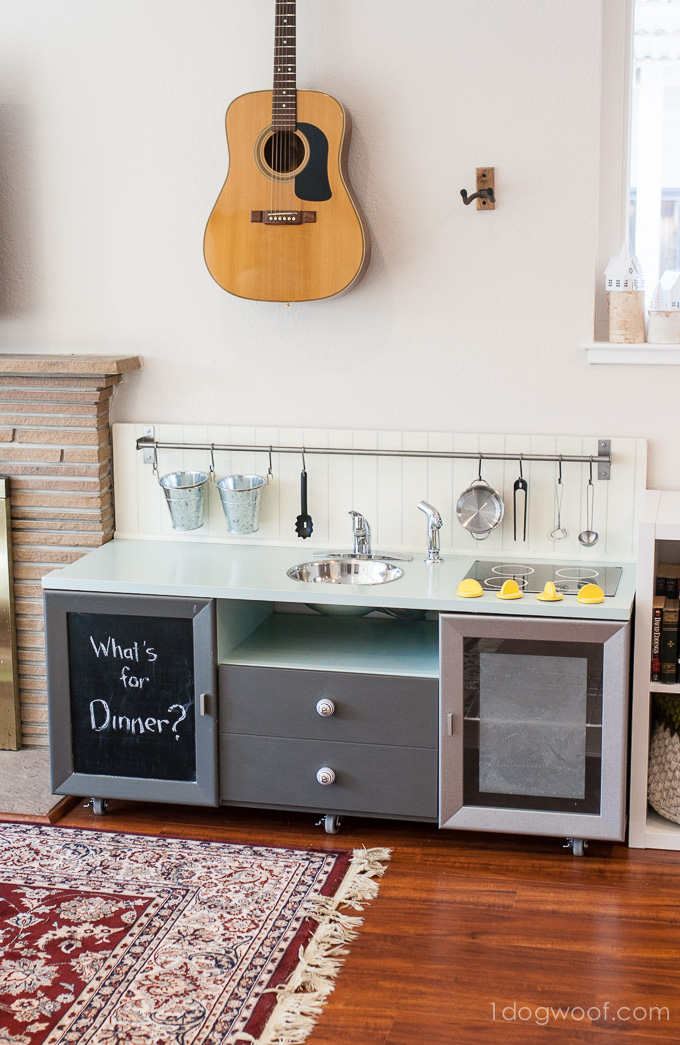
Instead of building a shelf, we grabbed an unused Ikea Grundtal bar from the garage to hang assorted buckets and utensils. The Grundtal system was from my old craft room that now had no home. Which brings us to…
DIY Play Kitchen on a Budget
Secret #7: Look in different and unexpected places for items you can use, without having to buy new. I looked through my own craft stash, the stuff in our garage and debated retiring items from our kitchen. It's the best way to save money and still have a real-looking play kitchen!
We re-used paint that we had on hand, which saved us a ton of money. Old or lesser quality paints were used as primer, while the more expensive Benjamin Moore Advance paint was used as the top coats. I had originally wanted a white kitchen, but the money savings of using our existing paints won the day, so now the kitchen is Kendall Charcoal gray with Palladian Blue counter-tops and cabinet interiors. The backsplash is painted with Annie Sloan Old White.
Secret tip: Even if your piece of furniture doesn't have a real "countertop", paint the top surface a different color to give the look of a countertop!
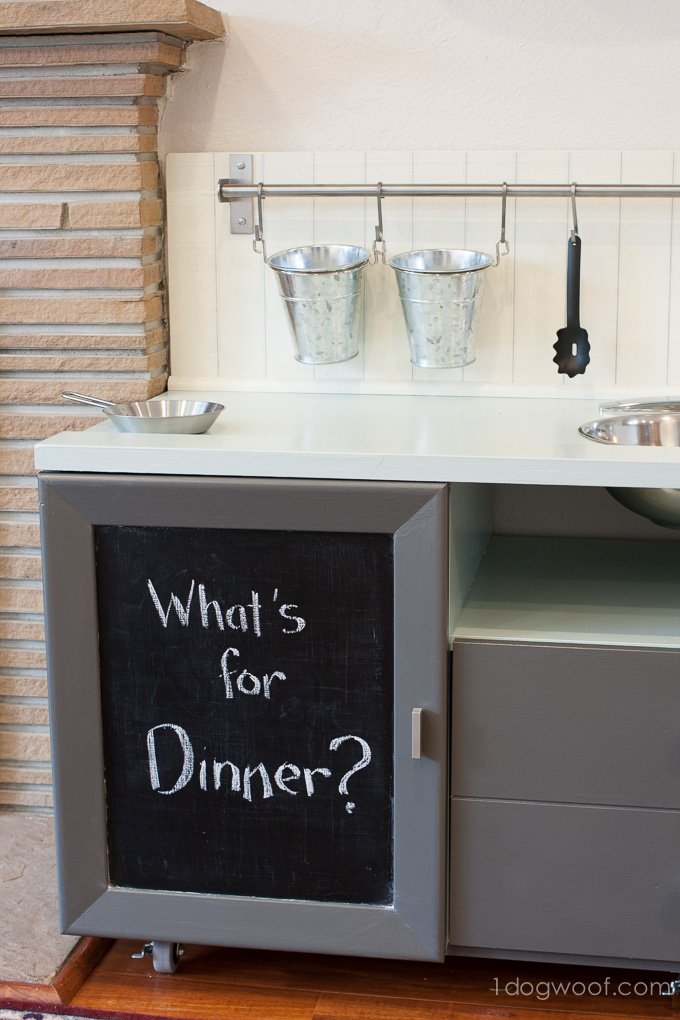
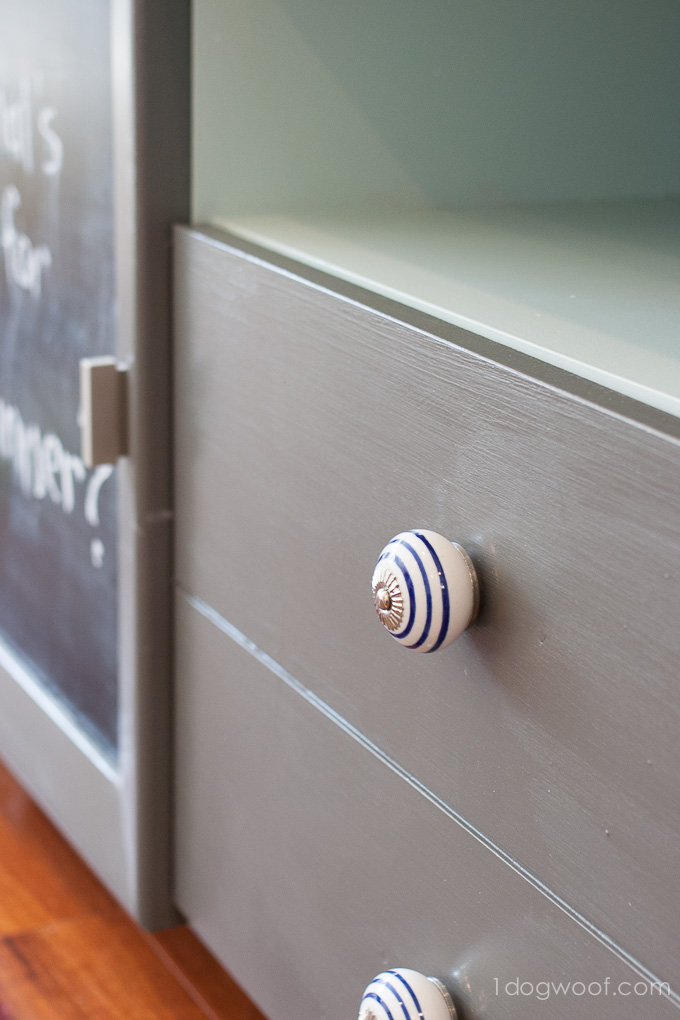
I painted the front of one of the cabinet doors with chalkboard paint that I had on hand, and replaced the drawer knobs with extra blue ceramic knobs from D Lawless Hardware that I had used on my hallway table.
Secret tip: Use chalkboard paint or whiteboard paint or magnetic paint to add a bit of different color/texture/functionality!
The interior shelving caused a few headaches. The movers had lost the actual shelves that went in the cabinet so we were shelf-less. It wasn't a big deal, since I wanted a rack for the "oven", but I still needed some sort of divider for the other cabinet and couldn't figure out what to use. Options were: baking racks. dishwashing drying racks, sink protector racks, plastic bins, plexiglass, wire baskets and MDF. For each of those options, I considered weight, cost and size, and nothing came close to what I wanted.
Secret #8: Interior shelves for the oven and fridge were 16 inch deep Closetmaid shelves. I bought a 4 foot length of 16 inch deep white Closetmaid shelving and a pack of small end caps for a total of around $10. Drew cut the shelf into 15 inch chunks (width of interior space) with a hacksaw and we capped all the ends with the little plastic toppers. The shelves sit on the plain old shelf rests that the movers did not lose (how they can lose the shelf but not the tiny shelf rests is beyond me). To be more stable, it's probably better to install some wood shelf rests in the cabinets, but this is our semi-temporary solution.
Here's a somewhat complete run-down of the materials I bought and what I had on-hand:
- paint: leftover paint for primer, Benjamin Moore Advance paint in Kendall Charcoal and Palladian Blue, Annie Sloan chalk paint in Old White, Martha Stewart black chalkboard paint
- Minwax 63333 Satin Polycrylic Protective Finishes, 1 Quart
*: $17.97
- Elmer's Products E847 Carpenter's Interior Wood Filler, 1/4-Pint
*: $4.98
- Sharpie Oil-Based Paint Markers, Fine Point, Silver, Each
*: $3.25 with tax
- philips flat head machine screws: 2 packs at $1.18 each
- 1/4 inch zinc washers: $1.18
- 5 ft base shoe: $3.40 from Home Depot
- white small shelf end caps: $1.48
- 4ft by 16 inch Closetmaid shelf: $8.98
- 11×14 acrylic sheet: $4.24
- 1 inch by 12 inch by 6 ft wood board: $13.95 from Home Depot
- black craft foam sheet: $0.99 from Michaels
- (6) 2-3/8″ wood circles: $0.99 each, from Michaels
- faucet from Habitat for Humanity ReStore: $10
- metal mixing bowl: $6.99 from HomeGoods
- Martha Stewart yellow acrylic paint
- Ikea Grundtal rail, S-hooks
- (2) Ikea Fintorp caddy
- Ikea Duktig kitchen utensil set
- D. Lawless Hardware Blue stripe ceramic knob
- Stabilo water-based fine line pen
*
- Silhouette Cameo + white vinyl
- metal brackets and cross-brace
- household tools: jigsaw, circular saw, hacksaw, clamps, sawhorses, power driver, power drill, screwdrivers, rulers, levels, wood screws, assorted Purdy paintbrushes and supplies.
Whew! I think that's it! Drew and I went through rounds and rounds of discussion and debate, weighing different options for every detail of this kitchen, so if we can spare you some legwork, we're happy to do it.

Oh yeah, and the kids love it. Of course. And it keeps most of their play food, dishes and utensils from being permanently spread out everywhere!
Even though the Silhouette was only a small part of the project, it was an important part, so see the links below to see how else you can get organized with your Silhouette machine!
Want to Check Out More Silhouette Projects?
Today My Silhouette Challenge buddies and I are all sharing projects on our blogs today, so peruse the projects below for a wealth of Silhouette inspiration!
1. Please Excuse My Craftermath… // 2. Simply Kelly Designs // 3. Daily Dwelling // 4. Ginger Snap Crafts // 5. Our Southern Home // 6. Sowdering About // 7. The Moberg Family // 8. Decor Adventures // 9. Pineapples and Pinecones // 10. Patina Paradise // 11. The Thinking Closet // 12. It Happens in a Blink // 13. Adventures in All Things Food // 14. From Wine to Whine // 15. Practically Functional // 16. Dragonfly & Lily Pads // 17. unOriginal Mom // 18. One Dog Woof // 19. Creative Ramblings // 20. My Favorite Finds // 21. Create it. Go! // 22. A Prudent Life // 23. Where The Smiles Have Been // 24. Barb's Life // 25. Everyday Paper // 26. Pitter and Glink // 27. Peanut Life Adventures // 28. Feto Soap Blog // 29. Our Rosey Life // 30. Two Purple Couches // 31. My Paper Craze // 32. TitiCrafty // 33. Lil Mrs Tori
How To Build A Play Kitchen From Wood
Source: https://www.1dogwoof.com/secrets-of-how-we-built-our-diy-play-kitchen-under-90/
Posted by: wardunty1992.blogspot.com
0 Response to "How To Build A Play Kitchen From Wood"
Post a Comment